Sunday, November 14, 2010

New Still Life -- Tenebrist Design with a Fishing Theme

Below is a photo of the setup for the next still life... There are 2 requirements for this project:
1. Tenebrist lighting. The Wikipedia definition of tenebrism is this: "from the Italian tenebroso ("murky"), (also called dramatic illumination) is a style of painting using very pronounced chiaroscuro, where there are violent contrasts of light and dark, and darkness becomes a dominating feature of the image."
2. Something with writing on it.

I choose these objects or "characters":
  • a cork lantern with tattered blue cord at its base, propped up on wood blocks
  • a piece of old driftwood that looks like a petrified pike with its mouth open (but no teeth)
  • red, black, and white cloth from the Ukraine
  • an Ontario nature book open at a page showing an image and description of two fish -- a perch and a rainbow trout
  • an old wooden fishing lure that is red on the top and has two beady eyes
  • a bright yellow/red lure that has seen better days.
All of these objects are sitting in an ordinary cardboard box lined with black paper. On top and on the left side are 2 loose foam boards. When you pull them forward or back, the amount of lighing around the center grows or diminishes.

I spent 2 Saturday afternoons toying with this set up. In my first composition, the cork lantern was central and the driftwood came out from the right. This time, I shifted the lantern to the right, and then changed some of the diagonals. But the biggest change was the introduction of the yellow jure as the colour anomaly -- an object that doesn't look like it belongs and so when it appears the eye jumps to it. 

I've placed my yellow lure slightly off centre and hanging down from the top of the box. My camera on its tripod wasn't at my eye level and it tended to focus on the lure as the closest object, making it seem larger. It's actually smaller! In the final setup, I also changed the positioning of the blue cord and the red lure slightly.


Thursday, October 28, 2010

Final touches for Still Life #1

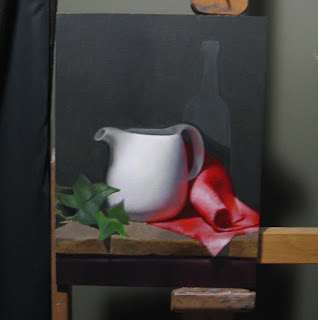
I've been putting some finishing touches on this still life, including lightening up areas of the background instead of keeping it one solid colour. The greens in the bottle have been drying at different rates and the camera itself is picking that out as well. When the area dries, the bottle should sit more quietly in the background. The final thing I want to do is to improve the blending in the spout -- my old brushes were making that difficult. That's all that's left before calling it quits and taking the tea pot home.

Wednesday, October 13, 2010

Red, White and Green Still Life -- nearing completion...

I've spent the last few sessions on small details, softing and hardening edges to bring things to a final finish.
Last night I repainted the bottle, first oiling in the surrounding area so that I could see again the paint that has already sunk in. I still need to lose the edge on the left side or at least make it more symmetrical with the right, even though I've been painting it exactly the way I see it. The other things left on my To Do List include:
  • repainting the highight on the tea pot again using white mixed with stand oil to make it both brighter and more opaque than a regular glaze
  • smoothing the finish on the spout
  • adding a grey glaze to the top of the roll on the red cloth (genuine dust has accumlated now)
  • repainting the tea pot's handle, especially the edges that meet the background 


Monday, October 11, 2010

Wayne's Portrait -- Finished and Drying

Well, it took long enough but I finally wrapped up this picture on this Thanksgiving weekend.  I first added glazes of white and blue to the left backround to give the impression of window panes. Then I concentrated on sharpening some edges and softening others on the shirt. The larger areas I worked in are still very fresh and glossy, which the camera picks up no matter angle or setting I use. Eventually, the linseed oil/mineral spirits mixture will evaporate and the pigment will sink back into a dull matte, like the rest of the background and the chest. As it dries over the next six months, everything should even out -- and then come alive when I varnish. Now on to the next one.


Wednesday, September 1, 2010

Fresh background for the still life

I spent last night resaturating the background with a solid, fresh layer of ivory black/pale yellow ochre (which makes the green of the wall) and linseed oil, and blending it into the edges of the bottle. I also took the opportunity to repaint the bottle with a higher chroma green (Sap Green) and to lose some of its edges into the wet background. I'm not so concerned now with getting a symmetrical shape and the outline of the real bottle does get lost in places. But I still have to see how things look after the paint dries. In the meantime, I'll move on to other areas...


Sunday, August 22, 2010

Update on the Battle of Cascina (charcoal and chalk)

I haven't spent much time on this drawing since May but thought I'd post a new view of it as an incentive to continue. The project began a year ago August (click here to view earlier blog entry below) as an exercise to see how well charcoal and white chalk work together on toned paper. I began by concentrating on particular areas, but now realize it's best to take a systematic approach and deal with all dark areas first before venturing into the lights (it's so easy to overdo the white highlights). So I'll be shifting over to the second figure on my next pass...


Wayne's Portrait (continued...)

Since posting my last update on this painting (when I described cropping the painting),  I've been concentrating on finishing the shirt and shorts, with the aim of making the folds and edges softer. I also repainted the left arm/hand (the one in shadow) and face, but still need to reshape the eye slightly. After that, repainting the other arm is at the top of my list of things to do. Once that's done, I'll finish the background once and for all: the drapes, the window panes, and the view beyond. Much of the background drapery has now sunk into the canvas, which is OK. The real challenge will be depicting the window panes with their own reflections and streaks on top of the exterior scene.


Update on the Red, White and Green Still Life

It's been a long while since I've posted a photo of this still life in progress. Fortunately, the list of things to do before finishing this painting of is growing shorter.

I painted the wine bottle in yesterday, using only high chroma greens (vermillion, sap green, and a bit of pale yellow ochre -- no white). Trouble is, the real green background (a mix of ivory black and pale yellow ochre) has long since sunk into the panel so I haven't really been able to blend the bottle back in. In the next session, I'll repaint the background with the green and linseed oil and blend the edges of the bottle into it. I also need to make the outline of the bottle more symmetrical, even though the real bottle is flawed (I keep insisting it is, anyway). One trick suggested: on the computer, trace the outline of one side, then flip it over and lay it over the other side. That should tell me how to correct the other side.

The red cloth just needs a few minor touches. The far right edge needs to be darker and greyer to suggest that it's receding in the distance. This should help make the front of the cloth jump out even more. Other final touches: repainting the leaves and toning down the highlights, and adding a few more scratches/eteches into the edge of the board.

Monday, June 14, 2010

Indirect Painting for Texture

The still life at the school is progressing. Nearly every area is ready now for the second painting stage except for the cloth. In the winter, I painted several layers of white over areas of the the red (an indirect painting technique) to create the foundation for highlights, primarily on the front flap and the middle of the roll. Later I applied several glazes of red back over the white areas, and then the highlights I wanted emerged. What I didn't get was a sense of texture. The cloth has a strong weave in two directions and its edges are very frayed. I should have built that texture into my original layers of white when doing the indirect painting because I can't achieve it with the cadmium red paint on its own. So I'm back at it again. Over the last month, I've applied several fine white lines and white blobs to mimic the pattern. Now when I re-glaze it with red the pattern should be retained... We'll see.


Surgery -- unfortunate, avoidable, but necessary this time

I've been stuck for a long time on this painting. I thought my challenge was dealing with the large windows but the real issue was one of distorted proportions that I unwittingly made in the figure. Most of the distortion takes place in the legs and it is grows proportionately the farther down you go. In the photo below, the source photo is placed to the right of a photo of the painting. Using the head as a measuring unit, my painted figure ends up being half a head too short. This is something I should have checked at the cartoon stage before transferring the drawing. I didn't leave myself enough room on the bottom of the canvas to fix it so..... off with his legs! (Sorry Wayne)


The revised composition is below. I restretched the canvas over 12x18 stretchers and I like the result. I started painting in a background through the windows and will add details of the deck in the lower 2 pane. I also began reworking the figure's facial features, moving the eye and lips down. Next session, the cheekbone will be moved down as well and widened.

Saturday, April 17, 2010

When Oil Paint goes to sleep

A few weeks ago, I decided to repaint the background and especially the bottle. I hadn't touched my background since I first laid down the dark greens and it was bothering me, especially where the bottle meets the cloth. The bottle has its own rich local colour, a kind of cool, bluish green that differs from the green wall, and yet it sits in front of the wall so some of the wall has to be seen inside the bottle. Later, highlights and reflections will be added to the bottle.

What surprised me was how quickly the background dried and then faded away into the linen. It's now a kind of dull matte and the bottle green is almost lost in the wall green. Apparently, the expression used is that the paint has gone "dormant" and won't reawaken until it is varnished.

The first photo below shows what the background looked like immediately after I applied it. The second shows the impact of drying, one week later.


Perspective on Wayne's portrait

Work resumes on Wayne's portrait, which I first began last July. I stopped last fall after completing a "first painting" of the figure, knowing full that I'd be making corrections to the expression and shadows later. What I forgot then was the importance of the background to most portraits, and how the values there determine what range of values are acceptable in the figure. For that reason, backgrounds are normally laid in roughly first.

And in academic painting (my style of realism I've learned to paint in) every area should be treated equally at every step along the way. So I'm catching up on the background before I return to the figure.

Wayne's portrait is unusual for me in a couple of ways. The light pouring through the windows, as shown in the photo, bleaches the clothing and face, flattening them, and making it more difficult to convey form. This is so different from an indoor studio portrait where the light source is at a distance from the figure and doesn't dominate or compete for attention. Colour is much more convincing too.

Perspective is another challenge. There are lines in the windows, walls, and floor that lead the eye into the distance, towards a vanishing point that happens to be a few inches off the right side of the canvas. I ignored these in my preparatory drawing and should have taken more care. The old camera I used last fall badly distorted those perspective lines making it less useful as a reference point. To correct the painting, I decided to figure out the lines myself by using pieces of string. Luckily, I'm working on this portrait at the cottage, where Wayne posed, so I just take my eyes of the canvas, and paint what I see around me.

Below are two photos, the first showing the strings I used for finding perspective, and the second showing the results after I removed the strings. There is still much to do to make the background convincing but at least I'm making progress.


Sunday, March 28, 2010

Colour Mixing

While I'm ever so slowly building up the colour again on the clothe with successive glazes of cadmium red, I'm stopping to let the other areas of the painting catch up. First the leaves. The chroma has been too intense a green for several weeks. I tried several different mixtures to dull the chroma. Adding cadmium orange, and later burnt umber, didn't work for me. In theory, the compliment of red in the burnt umber or a close complimentary in orange should have done the trick, but only made them "hotter". So I think mixed a range of neutral grey values and added each to the range of greens on my largest leaf -- in equal measure... And now the greens are cooling off.

This week I'm going to tackle the background. It only has a first thin layer of dead colour on it. The correct recipe for the background green is ivory black + yellow ocre + some burnt umber... We debated at the school whether I should paint over the outline of the bottle completely and then paint the bottle on top. Bottle, being transclucent, would have some background green showing throw... But it in the real life set up, it's a different green (blue green, mostly vermillion) and the right edge of it is very prominent. So the consensus is to paint the bottle as I see it at the same time as the background and then blend the edges in.  One edge I need to deal with a.s.a.p is the place where the clothe recedes into the background. I have yet to turn it away from the front and blend it into the green wall.

Tuesday, March 23, 2010

Indirect Painting again -- three Saturdays

I'm still learning about this method called indirect painting. For a couple of weeks in a row, I've built up a layer of opaque white on the red cloth. The whitest white is supposed to represent the brightest part of the cloth, a brightness that can't be achieved any other way. The white painting sitting on top of my previous layers of cadmium red became quite tacky and slow to dry. I finally achieved what was needed on March 6th. A week later it was dry enough to put a thin layer of cadmium red back on top (March 13th). Finally, last week (March 20th), I added a second glaze of cadmium red and began trying to model the shape of the roll in the cloth, as well as the cloth's shadows. The shadows are a mixture of Alizarin Crimson and Cadmium Red. The lightest areas of the roll are probably as light now as I need them to be and I can darken the edges and the shadows in the next few weeks...

Saturday March 6


Saturday March 13


Saturday March 20


Mixing the green in the leaves has been another challenge. While it's easy to mix a solid green of high chroma (a "green" green), it's more difficult to tone down that greenness to make it seem more natural. I have the values correct, but my leaves are oppresively green. I first added Cadmium Orange to my mix, but that resulted in an odd warming effect, like a leaf in autumn about to turn. What I need to do is mix in Burnt Umber, whose "redness" is the complimentary of green and will "grey down" the green. Another way of achieving the same thing is to mix in a neutral "grey" (made by combining ivory black, raw umber, and white). An infusion of grey drains a colour of its chroma -- in my case, it should dull down the green very quickly.

I'll take some close-ups next time. These pictures were taken about 10 feet back from the easel and then cropped...

Saturday, February 20, 2010

Indirect Painting -- getting a start on it

Today, I moved on modelling the white pot, laid down some fresh green on the leaves, and then got a start on something new with the cloth: Indirect Painting.

Background: Some colours are so bright and intense that there's no way to mix the paint to achieve realistic highlights. If you merely mix white and red to achieve a lighter red, pink will result. The same thing will happen with some bright greens, blues, and violets. In my still life exercise here, I have a bright red cloth (almost pure cadmium red) with a large roll in it. I tried modelling the lightest part of the roll with cadmium orange and yellow mixed in with the red, but even that didn't brighten up the area in the way I wanted... So that's why indirect painting has to be done.

Here's the general idea: To achieve highlights, a coat of white is put down first over the original local colour (cadmium red). When the white dries, glazes of red are reapplied and the white shines through, not as pink but as a lighter red.

To begin, the original layer of red must be completely dry so that the fresh white doesn't combine with it to make pink. A small test confirms this. Next, pure white is added in all areas where the cloth is a lighter red than its local colour, in my case pure cadmium red, a perfect 5 on the value scale of 0 to 9. Where the red cloth is at its lightest, I applied the white paint at its full intensity. (Note: Juan recommended mixing some calcium carbonate to my flake white to ensure it would be as opaque as possible). As I move from the lightest red to the local colour red, I thin out and blend the white paint towards the pure red.

Two brushes are needed: one to lay down the pure white, and one absolutely clean brush to blend it out and lift it off as your move to the darker reds... (The mantra I think is: brush in, brush out)

In my picture below, the whitest whites are where the cloth shows off the lightest reds...


In two weeks' time, this white will be dry. Then I'll begin adding glazes of red on top. There no harm in having the white too white; I can always darken later. But the reverse is not true: If after applying the red glazes I find that the highlights are not bright enough because the white underneath was not opaque enough, then tough luck. It's too late to fix it.

Varnishing, Part 2

Varnishing is a controversial subject -- it seems to fire up emotions among the painters I've asked. Everyone has had a bad experience and a different theory as to why. Remedies also vary.

After applying three coats of varnish on the Juliano painting and not liking the results, I stripped it off one evening with mineral spirits using makeup pads (note: use odorless mineral spirits next time, and sponges not cotton pads, which leave hairs behind). Then I applied two fresh coats of varnish and it suddenly took much better to the canvas. The oil wasn't repelling it. Hypothesis: removing the mineral spirits left tiny scratches on the surface of the paint layer, giving the varnish something to hold on to. The results are good.

I also varnished the Patroclus painting, shown below. The first coat was almost perfect, only a tiny fraction of the varnish was repelled. The second coat, which I put on last night, looks good but now emphasizes some of the hairs and particles that settled between coats. Perhaps next time I'll stop at one layer of varnish.

I'm also considering building a varnishing cover to protect that painting from dust and hair. Two artists at the school have built one that's connected to their home dryer's ventilation system. A fan on the cover pulls in air through filters on the sides and blows it out through the dryer's vent.

With all of the photos I've taken of this painting, the automatic digital camera never picks up the warm colours of the skin. It seems to focus on the white of the shoulder and wash out everything else. I'm hoping a new SLR camera will help me solve that in the future.

Tuesday, February 16, 2010

Still Life continues...

The last two weeks, I've been working right to left, with a focus on the right half of the tea pot and cloth. I now need to finish reshaping the spout -- pushing it up and lengthening it -- and pushing in the pot's top left side. Next step will be to improve on the pot's colour (there should be more brown around the spout and less green; plus more purple on the top right side and less grey). Finally, I'll move onto the leaves, which still have their thin layer of dead colour. Things are moving along...

Sunday, February 7, 2010

Varnishing -- first attempt

A layer of varnish is supposed to help protect a painting from dirt, dust and air pollution, as well as mechanical damage (like scratching). It also restores a painting’s original brilliant colours (oil paint tends to become dull and discoloured over time). Varnish also homogenizes (evens out) the final appearance of a painting.

After waiting nearly two years, I was ready to give varnishing a try with my first oil painting, the monochrome Juliano painting. Last Sunday, I mixed the Gamvar varnish (which is a component system consisting of solvent and synthetic resin crystals that mimic old fashioned resin from trees) and then gave the painting two coats this week with a gentle edger foam brush. I took the picture below just after I finished the second layer...


The paint certainly comes alive but I immediately noticed one problem: In some areas, the varnish seems to be repelled. I've highlighted a sample area below in red. Enlarge the picture and you'll see some patches where the varnish has not been absorbed. 

It's a known problem with  varnish. The general consensus is that some areas may contain excessive oil from the last layers of paint applied in the Second Painting phase. It's in this phase that the pure pigment is mixed with oil (linseed oil) to create smooth glasses. Dark areas of a painting tend to be worked over more than the lighter areas and so there's a risk that they'll react differently to varnish (or vice versa).

Today, I tried to fill in some of the pockets with a brush, but that didn't work well, so I've applied a third coat across the entire painting. Fortunately, more varnish has soaked in now and the pockets are less prominent. At the same time, however, the third layer seems to emphasize any flaws in the canvas, such as bumps and knots in weave of the canvas.  A good frame will make a difference though.

Sunday, January 31, 2010

Red reflection in the teapot

This week, I concentrated on the teapot, trying to model the shadows while also building up the shadows of the cloth alongside. The teapot is still too "blue", so I've been repainting it with some yellow ochre mixed into the white in the lightest areas, and raw umber in the shadow areas. That's a work in progress -- I haven't done anything yet around the spout, which is still too grey. I'll be adding some green to that side.

The red reflection on the right side does complicate things. It reaches up into the half-tones of the shadows in the teapot more than I appreciated before. On my first go, the underlying red shone through beautifully over a layer of grey that I had added. But now the grey has dried too opaque, and so I need to go back over it with a glaze of cadmium red again. This coming week, I'll be building up the shadows of the cloth and redrawing the contour of the pot on the right side. The shadow will be built up with pure Alizorin Crimson. Juan also suggested blending some Alizorin Crimson and Cadmium Red to create some of the frayed ends of the cloth, particularly in the spot where the cloth rolls.


Saturday, January 23, 2010

Strange beginning

My still life has had a strange beginning, it seems to me. But I've been following the correct approach. The current phase goes by three names used interchangeably.
  • Dead Colour: the paint you first apply gets soaked up by the "ground" of the panel or canvas, leaving it looking rather dull. Yup.
  • Local Colour: the goal is to paint the true colour of the objects. That is, the colour you'd see if there were no lights and shadows and reflections changing the colour of the object. It's almost impossible to get this right so they just tell us to put down whatever you can,
  • First Inlay: Add a thin layer the consistency of house paint, and then let it dry. It's tempting to want to fix the colour at your first go while it's still fresh, but then you make the mistake of doubling the layer of paint.  
I'm nearly done this stage, with just a bit more work to do on the tea pot (which I'll explain below).


The red cloth is what gives this phase its strangeness for me. Wherever it sits, whether in light or in shadow, it has to be given a strong underpainting of its local colour, almost pure Cadmium Red. The reason is, I'm told, I'll never have another chance to give it its true "redness"-- it's all shadows of Alizorin Crimson and tints of Tintanium White after this. The red cloth is also reflected along the side and bottom of the teapot, and so it too gets a treatment of Cadmium Red too, although I haven't done a good job yet of blending it with the teapot's local colour.
At this moment then, I have a large red blob on the panel, much larger than the equivalent red that will be seen in the finished painting. I can still see the boundaries of my drawing for shadows and the edge of the pot, so that hasn't been lost.

The white teapot also needs more work because it isn't really a white. I did a quick lay in with variants of grey, but it's obviously too cool a grey. It should have been mixed with raw umber as well for the shadow areas (especially bottom) and a dash of yellow ochre for the centre. Next time.  

One other note I forgot to document. When I first started, I wanted to go from the centre out, light to dark. This was wrong. The dark values are needed first around the teapot to know how light it really is. And so the background top, sides, and bottom were completed first.